今回はMicrosoft Robotics Studio DocumentationのBasic Robotics TutorialsのRobotics Tutorial 1 (C#) - Accessing a Serviceを試してみる。タッチセンサーを押すと「Ouch - the bumper was pressed.」と表示するプログラムをVisual C#で作るのだ。
Tutorial (チュートリアル)はLEGO MINDSTORMS NXTを対象に書かれているが,まだNXTは私にとって高嶺の花なので,MINDSTORMS 2.0のRCXで試してみた。
細かいバージョンの違いのためだろうか,チュートリアル通りにいかない点があった。ただし,ドキュメントを全部読んでいるわけではないので,私の前提が間違っている可能性もある。その場合はご容赦いただきたい。
最初にすべきことは,新しいサービスを作ることだ。Microsoft Robotics Studio Documentationから抜粋すると,以下の部分だ。
----------------------------------------------------------

 To Create a New Service
 Open a Robotics Studio Command Prompt:

 From the Start menu, select All Programs,
 Microsoft Robotics Studio, then Microsoft Robotics
 Studio Command Prompt.
 Navigate to the Samples directory.

 cd samples>
 Run the DssNewService tool with the parameter
 /service:MyTutorial1
  which names the new service MyTutorial1 and creates it
  in a directory called MyTutorial1:
 >dssnewservice /service:MyTutorial1

----------------------------------------------------------
スタートメニューをたぐり,Microsoft Robotics Studio Command Promptを起動して,次のようにコマンドを打ち込む。

サブフォルダMyTutorial1にできたMyTutorial1.slnをダブルクリックすると,インストールされているVisual C#が立ち上がる。
----------------------------------------------------------

 To Add a Reference to the RoboticsCommon.Proxy.dll File
 From Visual Studio, right-click on References
  in the Solution Explorer and choose Add Reference.
  The Add Reference dialog box opens.
 In the .NET tab, select RoboticsCommon.proxy.

----------------------------------------------------------
次の手順は,RoboticsCommon.Proxy.dllに参照を設定することだ。
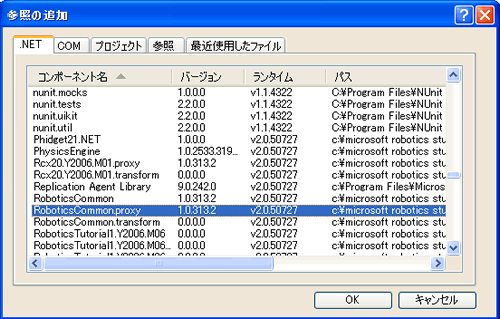
プロジェクト(P)-参照の追加(R)で.NETタブからRoboticsCommon.proxyを選択する。RoboticsCommonには接触センサー(Contact Sensor)に関する汎用的なコードが書かれている。
----------------------------------------------------------

At the top of MyTutorial1Service.cs, add a using directive
and alias for the generic ContactSensor contract
which is the basis for the bumper service.
The following code snippet uses the alias, bumper.

using bumper =
 Microsoft.Robotics.Services.ContactSensor.Proxy;

----------------------------------------------------------
そして,MyTutorial1.csの先頭に,
using bumper = Microsoft.Robotics.Services.ContactSensor.Proxy;を追加する。
----------------------------------------------------------

 using Microsoft.Ccr.Core;
 using Microsoft.Dss.Core;
 using Microsoft.Dss.Core.Attributes;
 using Microsoft.Dss.ServiceModel.Dssp;
 using Microsoft.Dss.ServiceModel.DsspServiceBase;
 using System;
 using System.Collections.Generic;
 using System.ComponentModel;
 using System.Xml;
 using mytutorial1 = Robotics.MyTutorial1;
 using bumper =
  Microsoft.Robotics.Services.ContactSensor.Proxy;

 namespace Robotics.MyTutorial1
  {
  (略)

----------------------------------------------------------
自動生成されたコードにはたくさんのusing句が記述されている。その後に,using bumper・・・を追加するのだ。
次にStep 2: Create a Partner Relationshipの説明に従いコードを追加する。
----------------------------------------------------------

[ServicePort("/mytutorial1", AllowMultipleInstances=false)]
 private MyTutorial1Operations _mainPort
  = new MyTutorial1Operations();

----------------------------------------------------------
と
----------------------------------------------------------

public MyTutorial1Service
 (DsspServiceCreationPort creationPort) : base(creationPort)
{
}

----------------------------------------------------------
の間に
----------------------------------------------------------

[Partner("bumper", Contract = bumper.Contract.Identifier,
 CreationPolicy = PartnerCreationPolicy.UseExisting)]
private bumper.ContactSensorArrayOperations _bumperPort
 = new bumper.ContactSensorArrayOperations();

----------------------------------------------------------
を追加する。
MyTutorial1 serviceとbumper serviceにパートナーシップを作成することになるらしい。心もとない説明で申し訳ないが,筆者もまだPartnerという宣言に実感が湧かない。
この後の説明を理解するのに少し時間を要した。
----------------------------------------------------------

 The simplest way to bind the service partner
 to your hardware is to start an additional manifest
 which contains the service contract(s) for your hardware.
 The following (highlighted) lines show you how
 to modify the command line arguments to include
 an additional manifest for the LEGO NXT bumper
 to the debug settings supplied by DssNewService.
 To find the contracts for hardware supported
 for this tutorial, check the \Samples\Config\ directory
 in your Microsoft Robotics Studio installation directory
 and look for the manifests which end with
 ".MotorTouchSensor.manifest.xml" and then find the one
 which corresponds with your supported robot.
 Modify your project settings under the Debug tab
 and change the Command Line Arguments setting
 to reference the proper manifest for your hardware.
 -port:50000 -tcpport:50001
  -manifest:"samples/MyTutorial1/MyTutorial1.manifest.xml"
 becomes:
 -port:50000 -tcpport:50001
  -manifest:
  "samples\config\LEGO.NXT.MotorTouchSensor.manifest.xml"
 -manifest:"samples/MyTutorial1/MyTutorial1.manifest.xml"

----------------------------------------------------------
抜粋が長くなってしまったが,特定のハードウェアを示すmanifest(マニフェスト)ファイルを指定するのだ。この指定で汎用的なコードが特定のロボットと結びつく。
LEGO.NXTではなく,RCXを使いたいので
-manifest:"samples\config\LEGO.NXT.MotorTouchSensor.manifest.xml"を適宜変更しなくてはいけない。
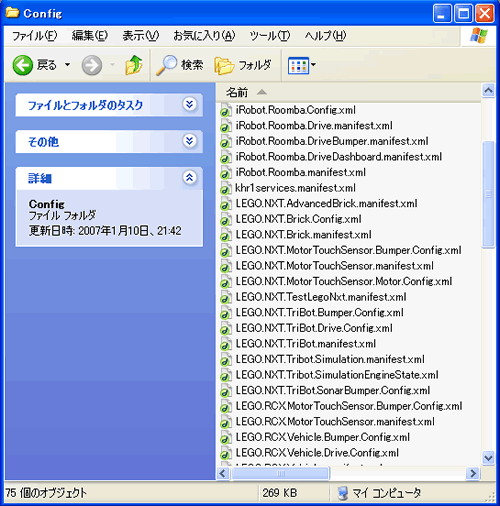
Microsoft Robotics Studioをインストールしたディレクトリ下のsamples\configフォルダを開くと,多くのマニフェストが表示される。LEGO.RCX.MotorTouchSensor.manifest.xmlを見つけるのに時間は掛からなかった。
では,
-manifest:"samples\config\LEGO.RCX.MotorTouchSensor.manifest.xml"をどこに書けばよいか。
Modify your project settings under the Debug tab and change the Command Line Arguments setting to reference the proper manifest for your hardware
この説明である。
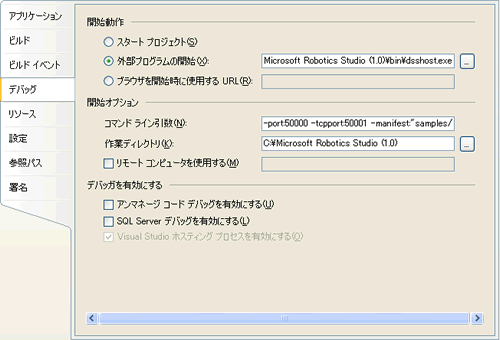
プロジェクト(P)-MyTutorial1のプロパティ(P)のデバッグ・タブのコマンド・ライン引数(N)に設定済みの引数(-manifest:"samples/MyTutorial1/MyTutorial1.manifest.xml")に追加して記述するのだ。
次のStep3の説明が,実際とは違っていた。
----------------------------------------------------------

 Step 3: Service Startup Initialization
 Every service must declare a Start() method.
 The Start() method is automatically called after a service
 is initialized. We will modify the Start() method to subscribe
 to the bumper service and begin listening for contact
 sensor notifications.
 In the Start() method, add a call to the SubscribeToBumpers
 method to subscribe to the bumper service.

 protected override void Start()
 {
 // Listen on the main port for requests and call
  the appropriate handler.
 ActivateDsspOperationHandlers();
 // Start listening for bumpers.
 SubscribeToBumpers();
 // Publish the service to the local service Directory
 DirectoryInsert();
 // Display HTTP service URI.
 LogInfo(LogGroups.Console, "Service uri: ");
 }

 The other method calls that you see in the Start()
 method are a part of the template that was created
 by the DssNewService tool. To learn more about
 the Start() method or the DssNewService tool, refer
 to the Service tutorials.

----------------------------------------------------------
他のメソッド呼び出しは生成されているので,SubscribeToBumpers();だけを追加すればよいと書いてあるが,実際には,Startメソッドは以下のように記述されているだけだった。
----------------------------------------------------------

 protected override void Start()
 {
 	base.Start();
 	// Add service specific initialization here.
 }

----------------------------------------------------------
そこで,base.Start();をコメント化して以下のコードをStartメソッドに追加した。
----------------------------------------------------------

 ActivateDsspOperationHandlers();
 SubscribeToBumpers();
 DirectoryInsert();
 LogInfo(LogGroups.Console, "Service uri: ");

----------------------------------------------------------
最後に,チュートリアル通りに,SubscribeToBumpersメソッドとBumperHandlerを追加すれば,Robotics Tutorial 1 (C#) - Accessing a Serviceのコードは完成だ。
----------------------------------------------------------

 void SubscribeToBumpers()
 {
 // Create the bumper notification port.
 bumper.ContactSensorArrayOperations bumperNotificationPort
  = new bumper.ContactSensorArrayOperations();

 // Subscribe to the bumper service, receive notifications
  on the bumperNotificationPort.
 _bumperPort.Subscribe(bumperNotificationPort);

 // Start listening for updates from the bumper service.
 Activate(
 Arbiter.Receive
   (true, bumperNotificationPort, BumperHandler));
 }

 private void BumperHandler(bumper.Update notification)
 {
 // Create the bumper notification port.
 if (notification.Body.Pressed)
  LogInfo(LogGroups.Console,
    "Ouch - the bumper was pressed.");
 }

----------------------------------------------------------
MINDSTORMS2.0のIRタワーをパソコンにつなぎ,RCXにタッチセンサーを取り付ける。
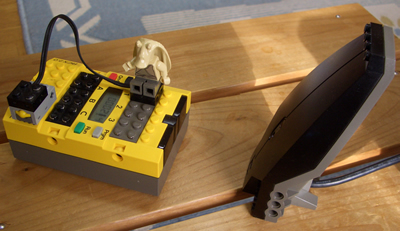
デバッグ開始ボタンを押してプログラムを起動する。
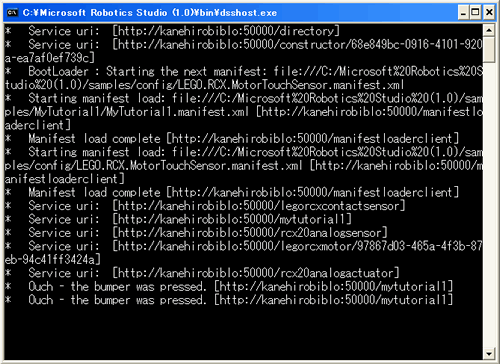
先ほど,指定したマニフェストを引数に取り,外部プログラムの開始に指定されたdsshost.exeが実行される。サービスが利用可能になったのである。サービスはソフトウェアやハードウェアのインターフェイスになる。
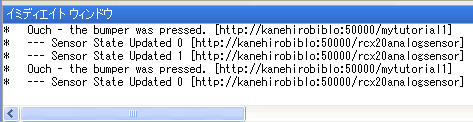
タッチセンサーを押すと,Ouch - the bumper was pressed.と表示された。


